Transmogrified Cubic Luminary*

*Also known as a lamp made out of a box.

Kathy said she needed some additional lighting for the Joe Bean roastery/office that was not “industrial fluorescent-ish”. That sounded like a creative opportunity to me.

I started with these really nice wooden gift boxes and lamp parts that I scavenged from a few junk lamps I picked up at the Goodwill. (It’s cheaper to dissect lamps than to get new parts from an electronics store. Plus, sometimes you find stuff that has a bit of character to it.)

Here’s what I came up with:

Lamp off.

Lamp off.

When the lid is closed, the lamp serves as an accent light. I drilled 1.5″ holes on the sides and top to let the light escape. (Light needs to feel free or it gets cranky and depressed.)

Lamp on, with front closed.

Lamp on, with front closed.

The brightness is increased by sliding the lid open. (Apologies for the exposure issues. Lamps are really hard to shoot when they are on and you are using an iPhone.)

Lamp on, slider half open. The brightness is adjusted by sliding the lid.

Lamp on, slider half open.

Here it is captured off, so you can see it a little better.

Lamp off. Lid half open.

Lamp off. Lid half open.

If you fully remove the door, you can then swing open the diffuser to access the bulb. The diffuser is some fancy rice paper glued with Mod-Podge to the back of a cedar shingle with a hole cut in it.

Bulb access.

Bulb access.

I used unfinished pine to match the gift box. Some scavenged cord with an integrated plug end is attached to wire from the lamp head and held together with wire caps that are hidden in the little box below.

Games from Garbage

My wife requested that I create some outdoor games for the cocktail hour at my son’s wedding. She had some cool examples from Pinterest. I didn’t end up using any of them directly, but they helped springboard some ideas. I came up with three, which I will share in three installments (to milk them for all their bloggy worth).

My goal was to create games that required no trips to the hardware store. I very nearly succeeded except for needing a bit of rope. But I found everything else I needed by rooting around in the garage. Yesss!

The first game was made with a vintage ironing board that I had recently curb-picked. I simply cut five evenly-spaced holes to accommodate some tin canisters that we had in surplus.

boardgame

The cans would have fallen through the holes because my cuts were slightly generous, so I added a single support board underneath that was simply attached to two blocks on each end. To make the board angle down slightly (towards the players), I added 2 new leg-stopper blocks closer to the pointy end of the board.

boardgame-side

For bean bags, we considered everything from buying some to making our own. Then my wife made a wonderful discovery in the attic: a storage bin full of Beanie Babies which had (surprisingly enough) NEVER become super-valuable collectors’ items. They made perfect playing pieces because they had the added benefit of being cute.

Next installment: Wine Bottle Ring Toss.

To all 5 of my loyal followers, please try to remain composed until I release it.

Make your own toppelduskin!

I can hear you now. You’re saying, “This toppelduskin thing sounds intriguing, Mike. I really want to make one. But I’m a little embarrassed to ask: What is a toppelduskin?”

Haha! Don’t be the least bit embarrassed. I only encountered my first officially recorded toppelduskin—quite by accident—just a couple of short years ago.

It happened like this.

So, I’m doing crafts with the kids in our congregation. And we are making—well, I don’t quite remember—but it did involve using seeds from various plants. And I had brought along an avocado seed because I have always thought they were cool, and I wanted to show the kids a bit of the amazing diversity of seeds types. (For some odd reason, I have an affinity for avocado seeds. I have a hard time throwing them away. They just seem so substantial and weighty—filled with untold possibilities.) At any rate, I had no intention that any of them would try to use the mammoth pit in their little creations. I was shortsighted.

All the kids were engrossed in making their seed-encrusted creations. And I looked over at Chuck, one of a pair of twin boys. He had seized upon the avocado pit and had pressed it into a blob of Play-doh. He was in the process of placing another hunk of dough on top of it. Intrigued, I asked Chuck what he was making. Without hesitation, he replied:

“I’m making a toppelduskin.”

I was shocked. What appeared to my untrained eye to be simply a random heap of stuff, was actually the product of clear a vision

“A toppelduskin?” I said. “I’ve never heard of that before! What’s that?”

His twin brother, Dave, with that uncanny insight that only twins have of their counterparts, immediately responded: “he just made that up”.

I was doubly impressed. Not only had this bright boy invented a new word on the spot, but his twin was so attuned to his brother that he instantly recognized it as a freshly minted word.

Wait. I was TRIPLY impressed. I had just witnessed the birth of an honest-to-goodness new word. Not one of those modern, so-called new words that are simply the mashing together of two common words like “blogosphere” of “thingiverse”. No. This was a spontaneous amalgamation of sounds that could only flow from the free mind of a child. A mind unfettered by grammatical rules and grownup-imposed notions about what is—and what is not—a “real” word.

It was a magical moment.

Ever since that glorious and fateful day, I have added toppelduskin to my arsenal of useful, important and fun words. And, I have gradually come to understand that a toppelduskin is not always an avocado pit pressed into Play-doh, but can indeed be any thing-that-you-make-that-you-don’t-know-what-it-is. And so, I am on a crusade to encourage others to make and/or identify toppelduskins wherever they might find them.

I have stumbled across the occasional, unintentional toppelduskin on Etsy, although none of the crafters are yet aware of the word. One shining example that comes to mind is the one I found while looking for uses for discarded ceramic power line insulators. I had recently acquired a small batch from the roadside. They looked pretty cool, so I bundled them into my trunk, cleaned them off, lined them up on my workbench, and waited for the light to dawn.

Nothing.

So I looked for inspiration on Etsy. There, I discovered a small population of equally befuddled ceramic insulator owners. Some were even trying to sell them as raw materials; saying that they were “really cool” and “you can certainly find some good use for these”. But one Etsy proprietor towered above the others. She had taken an insulator and screwed a piece of weathered wood into the threaded hole. She called it something like “insulator-on-a-stick”. Yeah, I can hear you snickering (with perhaps even a light guffaw). Rightly so. Because, guess what? I just checked and, astonishingly, the item is still unsold! Well, I would like to postulate that this is not a product design issue. It is a marketing issue. If she had called it a toppelduskin, it would have sold for sure, because the name carries a certain quintessential mystique. Most people cannot fathom a need for an insulator-on-a-stick; but almost everyone wishes they had a toppelduskin to proudly display on their mantle or to adorn their toilet tank.

insulator-on-stick

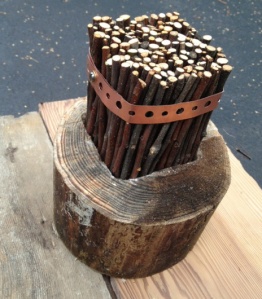
I recently ventured into the rocky, uncharted waters of toppelduskin making when I pruned my apple tree and could not bring myself to discard the huge faggot of super-straight water shoots. I cut the twigs into short, equal lengths and bound them with a copper band and set them on top of a small log. Ta-daa: Toppelduskin!

sticks and log

I know what you are thinking right now: “Gee, I think maybe I made a toppelduskin once, but I am not sure.” Or, perhaps, you are thinking about venturing into those uncharted waters yourself, but you are unsure of the criteria. And, you are afraid that you might make what you think is a toppelduskin, smugly present it to your slightly uptight and sometimes critical friend, and suddenly find yourself the subject of thinly disguised ridicule: “Oh. So that’s what you consider to be a toppelduskin? How…um…interesting!”

Well, let me help you avoid such an awkward situation. You can easily identify toppelduskins using my handy three-point check system:

1. You put two (or more) things together that normally do not go together.

2. You are not sure why you did it.

3. Someone asks you: “What is it?”

Actually, Step 3 is not so much a required step, but rather, a litmus test. After all, if someone looks at your creation and says that they have one like it at home, then it is hardly unique, and therefore unlikely to be worthy of the title of toppelduskin. To be fair, there is the remote possibility that your friend makes toppelduskins too. In which case, he may very well have one like it at home.

Actually, that raises another important question: What do you call someone who makes a toppelduskin? At first I thought it might a “toppeler” or a “dusker”, but I realized those names fall far short of the founder’s free-flowing, phonetical finesse.

One who makes toppelduskins is a skarbenfripper.

There is one last point to address: The temptation to succumb to the siren call of the flaccid, familiar comfort of utilitarianism. It will strike you at the very moment when victory is in your grasp. You will have just applied the Step 3 litmus test by subjecting your creation for review. And your judge will ask you, “what on earth you have done this time?” And you will think: “that is exactly what I was hoping to hear, but now I feel foolish”. And then you will feel the blood rushing to your face. And you will feel the need to justify your existence. And you will be tempted to say something stupid like, “It’s a candle holder” or “It’s an iPod holder” or some other common thing like that. And then your friend will say, “Oh…yeah…cool” as the light slowly dawns in her dim eyes and she inwardly congratulates herself for her keen ability to understand her quirky, artistic friend’s peculiar vision. And you—you poor fool—you will have that abominable mix of emotions that can only come by fighting your way to the top of the cheerleading squad, and then willingly surrendering your glorious position just to taste the hollow and fleeting acceptance of the prom queen. How sad.

Don’t do it. Be strong. Be courageous. Be free. Be a skarbenfripper. Make toppelduskins joyfully and shamelessly.

If you do make your own toppelduskin, please share it with me and the rest of the world.

In my dream world, toppelduskin will some day make it into Webster’s dictionary. Skarbenfripper would be a nice bonus.

Also, I hope you were impressed by my correct and non-offensive use of the word “faggot”.

Score 3 extra Beatles points if you wondered where Vera was.

A more transient form of the discipline: The TableToppelduskin. I was greeted by this fine example one day. It had the added benfit of dual purpose in that it also informed me that paper supplies were restocked.

A more transient form of the discipline: TableToppelduskin. I was greeted one morning by this fine example which one of my studio mates had left. It had the added benefit of dual purpose in that it also informed me that paper supplies had been restocked.

Beautifully Imprfect

Whenever I go to the beach or the woods, it seems that I am always meeting interesting sticks that I want to keep. Weathered, worm-eaten, gnarly and grayed—love it. And when I am on the road, I am always looking for chunks of rusty car parts. The inevitable and unpredictable changes produced by the slow, relentless march of time. It always fascinates me.

Little did I know, the Japanese have an ancient term to describe the very thing that my eye is always on the lookout for. It is the major impetus behind much of my current extracurricular creative work. The term is wabi-sabi. I learned the term in this article I found on Houzz. It does a nice job of summarizing it, along with some pretty pictures.

Bar(n) Raising

Part 2: A (relative) bum nearly gets eaten by a grizzly

As I mentioned in Part 1, Ben’s vision involved aged barn wood for portions of the bar. Following a hot tip I visited this guy in Williamson, NY. When I pulled into his farm country property, I was instantly in love. A miniature barn on my left was surrounded by a small herd of goats. Up ahead was this beautifully restored old farm-house. Beyond that, some farm land, trees, a couple more really nice old barns.

home-on-the-range

As I stepped out of the car, my host greeted me from the porch. “This place is awesome!”, I blurted out. “We like it”, he said. I asked if he would show me around and he humbly obliged. I only managed to squeeze off a few shots because it felt  funny to act like a tourist. He showed me all sorts of self-made works: sweet vintage furniture, stamped concrete floors, and the stone entry to his basement that he was making entirely by hand-stacking—no mortar. Beautiful.

stone-entry

He knew I was looking for some old barn wood, so he showed me around his outbuildings. In addition to lots of great randomly salvaged lumber, he had at least 2 complete disassembled barns, stacked up like Lincoln Logs and waiting to be reassembled. (You can see one against the wall in the shot I sneaked in below.)

lincoln-logs

Now, I’m talking to this guy, and he’s telling me all the stuff they do on their farm—he, his wife, and five boys from 18 years on down to very young—and how they raise goats, make cheese, harvest rocks and timber and sell them, grow some crops, buy old barns at auctions, disassemble and reassemble them at home, and on and on, not to mention the fact that he runs his own full-time small construction business building stuff for other people…and I suddenly realized: I am a bum. Well, at least relatively speaking. I know not to dwell too long in the mire of self-deprecation, so I quickly translated that energy towards setting my own sights higher concerning what I could achieve.

Well, I finally selected some great old timbers, which I later came to discover were white oak. No wonder those old barns stand for so long. When I left, I told my host that I REALLY wanted to be there for his next barn raising, and he promised to let me know when it was happening. So, here’s hoping!

cut-planBack at Joe Bean, we made a cut plan to maximize our use of the wood and save as much for future use as possible. We made the rough cuts and I squeezed the hefty stack into my tiny Scion xD and headed over to Rochester Makerspace to do some precision cutting and planing.

I  just recently joined the Makerspace, which is something I am really jazzed about. (I donated the logo to help with the cause.) Just having access to the planer has already justified the cost of membership. This old oak is so hard that, if I had to sand instead of using the planer, I would still be at it.

rochester makerspace logo

Wyatt, the VP, gave me some quick pointers on using the Grizzly and headed off. I was left alone with it. He told me that if it tried to eat me, I should scream really loud and hopefully someone else in the building would hear. I promised to be careful. And I was. But I still had a close call. If you will refer to my handy diagram, you will see that the power switch and feed are on one side and the output is on the other. Well, you stick your board in the one side and Grizzly grips the board really tight, pushes it under the blades which shave off a thin layer from the top, and then it spits it out the other side. I was focused mainly on being extra careful on the feed side. What I failed to consider was the fact that as the board comes out the back side, it is still tightly gripped by the internal rollers. So, if you are wearing gloves and you are catching the board as it comes out the back side, and your finger tip is under the board and above one of those back rollers, and your finger gets caught there, (here’s the bummer) the board keeps coming. And the power switch is way over on the feed side where you can’t reach it. Fortunately, I managed to yank my finger as soon as it caught and only ended up with a small blood blister.

Grizzly-G0550-Planer

Here’s a few shots of the progression from raw board to finished bar top. One of the tricks with old barn wood is deciding how much of the old grunge to keep while balancing that against the desired level of smoothness and gloss for the application. These pieces had a considerable amount of peeling white wash and thick grunge that was not going to work well on a counter top. So I shaved most of it off and kept just a few hints of grunge where it worked well. I also had a few issues planing and wound up with a few digs, but I didn’t sweat it because some rugged imperfections fit right in for this application.

Before and after planing

Before and after planing

Cuts all done

Cuts all done

Testing the fit

Testing the fit

Coating with Helmsman spar urethane

Coating with Helmsman spar urethane

And here’s a few shots of finishing the concrete and bringing it all back together. I am tired of writing. You are probably tired of scrolling. Click any image to see it bigger.

sanding the concrete

sanding the concrete

I wore respirator plus ear protection, because the scraping was like fingernails on a chalkboard. It made me wanna hurl.

I wore respirator plus ear protection, because the scraping was like fingernails on a chalkboard. It made me wanna hurl.

sanding up close

sanding up close

Staining and coating the concrete

Staining and coating the concrete

Waxing and buffing

Waxing and buffing

almost there

almost there

The espresso machine going back. A happy sight.

The espresso machine going back. A happy sight.

Back in business

Back in business

Bar(n) Raising

Part 1: Death by Concrete

It started something like this. My son, Ben, says he wants to do new counter tops at our coffee bar. Poured concrete. Plus some barn wood sections. Plus a few other renovations. And it all has to get done the week of the Fourth of July. We would close the shop for a week to work on the project (later dubbed Project Mayhem).

I say “Ben, have you worked with concrete before?”

“No. But I got some videos.”

“Ok. So we will be learning how to do it while we work on the bar, which is the source of our livelihood. ”

“Right.”

“Perfect.”

Not that this should have come as any shock to me. That is pretty much the way the we have done everything, right from the moment we decided to get into coffee, eight grueling-yet-strangely-rewarding years ago. We learn as we go—and we hope that we don’t set ourselves on fire in the process. So far, so good.

Anyhow, a few days prior to project launch I had a text conversation with Ben to make sure he had all the details down. To his credit, he had done an amazing job of identifying all tools, materials and time line. Each day was planned in detail. Very good. But I was still nervous about the new concrete experience.

All was good until i asked about the type of concrete and what aggregate would be used. It ended like this (I am the Blue Team):
text-talk

Ultimately, the mix he had purchased already had aggregate, so it was a moot point. A few short days later, we dove into Project Mayhem.

STEP ONE: Buy twice as much concrete as you need.

Not on purpose, mind you. It’s just that there was a very slight miscalculation on the volume. Below you can see 4,000 pounds of being forklift loaded onto the Lowes rental truck. To make things more exciting, we were not able to move the palette full of concrete in the same convenient way back at the shop. Sooo, we had to move them one by one at 80 dusty, rocky pounds each. A couple weeks later, my friend Jim graciously helped me haul back the 2,000 pounds of unneeded material back to Lowes. I do not wish to see any more concrete for a while.

loading-concrete

STEP 2: Teardown

This is the only shot I had handy to show at least a portion of the offensive bar top. Not that it was all that bad. A decent looking Formica. But it did not fit our desired image. And it was starting to show wear after two years. Apparently, when the counter was first installed, the builder said that this counter would last a long time as long as it “did not get exposed to heat or water”. Dandy. Apparently nobody briefed him on what happens in a coffee shop.

teardown

STEP 3: Build a base

We built the base by first laying down plywood, then laying Durock on top of that, and then using a newish product called Z-Counterform to create the outer walls that would keep the concrete where it wanted it, instead of on the floor. Whoops, wait: one very useful step:  sheets of plastic were laid on top of the plywood that were long enough to hang down on both sides of the counter to protect all the stuff under the cabinets during the muddy, dusty process. Very nice.

The Counterform worked quite well, including snapping off cleanly after the concrete had set. The only issue we had was slight sagging on edges that spanned long distances. These could have used additional support, although it was not mentioned by the manufacturer. The material comes in a few profile styles. We used the simple, square edge because we wanted some edges to be curved instead of hard-cornered. This was a tricky job as we had to cut a series of slices to allow us to bend the material to the deisired curve. A lot of back-and-forth to get it right.

plywood-base

STEP 4: Mix and pack

To mix, we bought a drywall mixing attachment and stuck it onto  something called an angle drill that we rented from Taylor Rental for $20 a day. We wanted a nifty tool specially designed for concrete that we saw on the Buddy Rhodes instructional videos, but they had never heard of the Perles mixer.

mixing-concrete

I had some older buckets that we started mixing in. We dumped two bags of concrete in, added water and started mixing. Disaster. The mixer smashed through the side and concrete spilled all over the loading dock where we were mixing. I sprinted to the shop to grab some buckets and shovel while Sean ran over to Ace to get some fresh large mixing buckets. The new ones held up better, but they still looked pretty sorry in short order. That mixing paddle packs a punch.

broken-bucket

Ultimately, we would be laying down about 200 square feet of concrete in one day. We needed a big crew for that.

We had a team of mixers making batches on the back dock. We would load the batches onto a wheelbarrow and then run them up to the shop to hand off to the mud pie team. Their job was to scoop handfuls of mud into the forms and try to get it especially tight against all the walls, and filled in the middle to about half the height of the forms.

all-hands

STEP 5: Smoothing

After the first layer was down, reinforcing wire mesh was laid onto that, and then a top layer of concrete over that. Then we set about smoothing it all out. First with the screed to get it basically level, but not very smooth.

screed

Next, we used a wooden “float” to start smoothing. This was a very touchy process that requires developing a certain technique of applying very little pressure along with plenty of motion to encourage the cement and pea gravel to settle into place. And you have to know when to stop and wait for the next smoothing step. But since we had so much real estate to cover, there really wasn’t much waiting because some part of the counter was always ready for attention. Along with the first smoothing, we used a vibrating sander (with no sanding pad) to vibrate all the edges to coax all the air bubbles to the surface and away from the outer edges.

first-smoothing

Apologies. If you are still reading, this is where I stopped taking pictures for a while because I was up to my elbows in mud and playing beat-the-clock to get everything smooth before the concrete set up beyond workability. It was intense, nerve-wracking and laborious. There were two more smoothing phases that were done with a steel trowel. More touchy-feely work that required us to become one with the mud. Mr. Miyagi would have been proud of us. (No smootha side side. Smootha figure eight like a Peggy Fleming.)

OK. This is turning into a long post, so Bar(n) Raising is going to be at least 2 posts long. Maybe 3. I will add one image for now: snapping off the form. A magic moment.

snap-off

Patinated Post

tractor at dusk

The old man softly called out to me from across the broad overgrown lawn…

“Whatcha doin?”

“Just taking a few pictures.”

“What are you doing that for?”

“For the artistic value.”

He just shook his head and turned to walk into the barn.

I grabbed a few shots of this beauty as fast as i could.

Maybe he was going in to fetch his shotgun.

The coloration was incredible.

And the presence of ET added that little extra dash of magic.

I had been driving in Williamson, New York at dusk, when I rolled past this rusted old beauty.

I just had to turn around.

tractor door

tractor tread

ET tractor

Something old, something new

How is it that on my days off I worker harder than my regular work days? I guess it’s the craftsman’s curse. But nothing is more satisfying than making something with your own two hands, so any time I get to spend making stuff in my garage always feels a bit like a vacation to me.

This past Friday I took the day off from work and pleasantly surprised myself by cranking out 4 of these chunkified cube stools in one day. And that included 3 side trips to Lowes. Not bad! (Except for the fact that screws are ridiculously expensive these days.) I set up a little assembly line for myself and made all my cuts in groups. And my nice Bosch router with a round-off bit was a huge sanding time saver, plus it gave all the rounded edges a nice uniform appearance.

The 4 stools before finish was applied

The 4 stools before finish was applied

My original plan was to make these entirely from recovered pressure treated lumber, but my curb surfing was less fruitful than I hoped. So I decided to combine salvaged 4x4s with fresh, non-treated 2x4s and I love the result. The contrast of the shiny new wood next to the old, gray, cracked wood with hints of green really gives these lots of character. I made 4 of of these chunky stools with 7 new 2x4s (with just about zero excess), plus the pressure-treated 4x4s which were free, courtesy of a neighbor’s trash pile. Joy.

Coated with Helmsman Spar polyurethane.

Coated with Helmsman Spar polyurethane.

In case you’re curious, these measure 15″ on each side. I coated them with spar polyurethane. Two coats did just fine, although three are recommended. I would have done three, but I was too anxious to get them out in front of our coffee shop. I call them Pez cubes, because they look to me as though the shiny ends were pulled open to reveal the old, unfinished wood inside.

Melissa enjoys a cappuccino

Melissa enjoys a cappuccino at our new tables.

These stools make a nice companion to the tables I made entirely with salvaged pressure-treated 4x4s. These did get the recommended 3 coats of spar urethane in hopes of keeping splinters away and affording extra protection from cups and whatnot banging on them. That’s my daughter, Melissa, giving the stools and tables their inaugural seating. Doesn’t she make my work look extra good?

If I get any requests for actual plans I will be happy to post them. After I draw them, that is. ;P

There’s treasure everywhere

No Parking

I guess I will start my blog with an open confession: I—like Oscar (genus: grouch)—love trash. As I drive down the road, my eyes are constantly scanning the curb for good garbage. There are two main reasons for this:

1. I am (ahem) “frugal”.

2. Old beaten up stuff has qualities that are virtually impossible to imitate.

If I see something sweetly grungy, but which appears to belong to someone who cares or is just plain too big to fit in my little hatchback, I will at least try to get a good shot of it. For this purpose, the iPhone totally rocks. It’s always on my hip and ready for action. And with the help of my favorite app: Camera Awesome, its capable of some pretty darn good shots. And I do not like carrying a bulky 35mm around.

Not everyone is willing to publicly admit that they are a dumpster diver, but I wear the title with a small degree of sheepish pride. Heck, in these days of green consciousness and upcycling it may even be a badge of honor. Taking something that someone considered worthy of the dung heap and turning it into something useful and/or interesting-looking gives me a special kind of satisfaction. It’s like being in a secret club.

If things go as planned, which they rarely do, I will be posting some fun shots I have taken, shots of things I have made, and links to anything that seems noteworthy. Below are a few of my recent iPhone shots.

challenge

Good old printing stuff. This is part of a chase that I found while poking around at Pistachio Press.

tendril

A tendril of a grape vine that I fell in love with while making a big vine ball.

leaf prints

Apparently the Creator himself likes to print as well. I found these purely natural prints on the sidewalk.

Cheers!